
Disassembling Crossroads, part 2
Dan’s MEGA65 Digest for January 2025

Dan’s MEGA65 Digest has moved! To subscribe, please visit: https://dansanderson.com/mega65/

In last November’s Digest, we started a project to dissect the classic C64 title Crossroads, published by Compute!’s Gazette magazine in December 1987. We got a handle on how the game works by playing it, and by inspecting the running game state in Retro Debugger, a C64 emulator with memory visualization features. In this issue, we’ll get up close and personal with the Crossroads machine code, using a tool called a disassembler. Combined with what we’ve learned, and some world knowledge of Commodore programs, we can begin to produce human-readable assembly language source code for the game.
Crossroads was so popular that Compute! commissioned a sequel, Crossroads II: Pandemonium, which was published in December 1988. I did some searching to see if anyone has disassembled the Crossroads games already, and discovered an excellent disassembly of Crossroads II by Github user hyphz. For the sake of the exercise, I did not look closely at this disassembly at first, but I do expect the original Crossroads to be similar in many ways.
We won’t do a full disassembly of Crossroads in a single newsletter, but we’ll answer some of the most important questions. Before we do that, let’s see what everyone else is up to!
PET core pre-release

Olaf “Rhialto” Seibert is working on a Commodore PET core for the MEGA65, and has invited everyone to help test a pre-release version. The Filehost download includes core builds for R3 and R6 boards, and a copy of the necessary ROM files that you install on the SD card in a folder named pet/.
Do keep in mind that this is a pre-release and may be missing features. Check out the Commodore PET core on Github to see source files and file bugs. Many thanks to Rhialto for this exciting project!
Gaplus arcade core

muse continues to deliver arcade core goodness! This month, it’s Gaplus, the third game in the Galaga series from Namco. As usual, you will need to download the Gaplus core, locate MAME ROMs on the Internet, then follow the set-up instructions to produce the files for the SD card. The Gaplus core is available for both R3 and R6 mainboards.
I encountered an issue with the R6 version when using HDMI video where after a few seconds the game video becomes a static screen of vertical bars. This does not occur over VGA, or with the version for the R3 mainboard. A fix is in progress.
Goodwell’s QR code generator

Goodwell, aka The 8 Bit Theory on YouTube, recently attempted an experiment to write a QR code generator for multiple vintage Commodore computers in multiple languages, including BASIC 2, BASIC 7, C, 6502 assembly language—and BASIC 65 for the MEGA65. The video about the experience discusses implementation techniques and performance characteristics of these implementations. Definitely check it out, it’s worth watching the whole thing.
Goodwell uploaded the MEGA65 version to Filehost, and is continuing to refine it. It might even get added to the MEGA65 Intro Disk menu system, to make it easier to share URLs in the menu text. The Github repo for the QR code generator has all of the versions of the experiment, as source code.
Don’t miss Goodwell’s follow-up video about the MEGA65’s technical design, based on his early experiences developing for the computer.
MegaMage by SirGeldi

Hot off the presses! SirGeldi on Forum64.de has posted MEGAMage, a Roguelike adventure game written entirely in BASIC. Adorable character graphics and fast map scrolling enhance the gameplay. Even better, SirGeldi built the tools used to develop the graphics, map, and object and monster metadata for the game on the MEGA65 in BASIC, and has included these tools on the disk!
Download the .zip file from SirGeldi’s message post, unpack it, and transfer the D81 disk image to your MEGA65. To start the game, mount the disk image, then:
RUN "MEGAMAGE"Even more Featured Files!
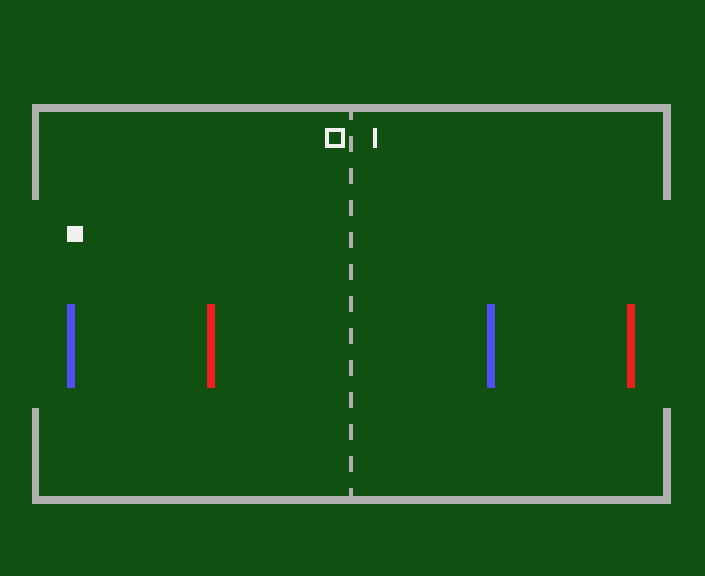
Soccer, by SirLazarus, is a new soccer-themed paddle game. It is written in BASIC, and requires the latest ROM beta version 920409 because it uses recently added features. (This ROM update will be included in the next stable release package.) Grab your paddle controllers and check it out!
Jotto 2020, by ToneDeF, is a word puzzle game similar to Mastermind. It plays something like Wordle, though its invention pre-dates Wordle by a year. ToneDeF originally wrote this for other micros, and made this new version for the MEGA65 in BASIC.
Pac-man in BASIC demo, by xlar54. This playable demo sports many features of the arcade classic, including music, sound, and polished graphics. xlar insists this is just a demo, but only a few features are missing (most notably power pellets). And yes, this too is implemented entirely in BASIC 65.
Opal Dance, by lochmana, is a colorful puzzle and maze game. Match colored pieces by walking into them, but think before you move! Each match of two pieces replaces the first piece with a wall, and removes the second piece. Clear as much of the level as you can.
Mega65 Perpetual Calendar, by gcastel (MiddleAgedCoder on Discord). Generate calendars for any month of any year. Developed for BASIC 65 with Eleven, you can get the source code from Github.
Xemu keyboard layout reference for Windows, by Discord user Digger. Windows users, keep this handy app open alongside the Xemu emulator to remember how to replicate MEGA65 keystrokes on the PC keyboard. See also the project homepage (in German), and the README file (in English) included with the download.
mouSTer back in stock
mouSTer, the USB-to-Commodore DB9 adapter for modern USB mice and game controllers, is back in stock after a long hiatus. This is one of the best ways to use a modern USB mouse with the MEGA65. It even works with wireless mice that use USB dongles. Get one while you can!
See RetroHax’s update from December 30, 2024 for details.
Digest administrative note
I am considering migrating the Digest to a new email newsletter service. As Substack evolves their business model and practices, I want to make sure the Digest is hosted on services that remain open and compatible with the values of the MEGA65 project. I’ll let everyone know in advance before I make changes.
The change should be fully automatic, including migrating donations made through the Substack interface as paid subscriptions. Hopefully I can migrate the read-aloud podcast feed URL automatically as well, but this will depend on how your podcast app is subscribed. I’ll try to figure it out and let you know. If anyone has any feedback on this change, please let me know. I know a couple of you are using the Substack app to read it, which should be the only case affected by a migration.
You can always find all issues of the Digest on my website and subscribe to it using an RSS feed reader. You can also become a patron of the Digest at ko-fi.com/dddaaannn.
The art of disassembly
A quick recap: A computer’s CPU performs instructions encoded as bytes in the computer’s memory. This machine code is difficult to work with as a list of numbers, so when we humans want to write a program, we use a programming language, and a tool that converts that language to machine code for the computer to execute. Assembly language is a human language that most closely resembles the machine code, with human-readable names for each machine code instruction. The corresponding conversion tool is called an assembler.
There’s a simple assembler built into the MEGA65’s machine language monitor. You can start the monitor by entering the MONITOR command at the READY prompt. Try doing this now, and use the A command to assemble this short program:
MONITOR
A1600 LDA #$01
STA $D020
LDA #$00
STA $D021
RTS
After the last line, press Return on a line by itself to stop the assembler.
As you type each line, the monitor converts the instruction to the corresponding machine code. It stores the machine code at the requested address in memory, and also prints the address and machine code bytes to the screen, as hexadecimal values.
A 1600  A9 01     LDA  #$01
A 1602  8D 20 D0  STA  $D020
A 1605  A9 00     LDA  #$00
A 1607  8D 21 D0  STA  $D021
A 160A  60        RTS
The monitor can also reverse this process, to show you which instructions are represented by bytes in memory. This process is known as disassembly. Use the D command followed by the address:
D1600Sure enough, the program you just entered is right where you put it, at address $1600. There’s also a bunch of other stuff after the last instruction you typed starting at address $160B, maybe garbage data or something left behind by another program. These bytes may or may not represent machine code instructions, but the disassembler diligently tries to interpret them as instructions either way. These instructions are what the CPU would perform if you told it to treat that memory as code.
The number of bytes used to encode an instruction differs depending on the instruction. Some instructions, like RTS, are encoded as a single byte. Others, like LDA #$01, use two bytes. Still others such as STA $D020 require three bytes. Anything trying to interpret bytes as machine code—whether that’s a disassembler or the CPU itself—needs to know the address of the first byte of the first instruction, or it could get very confused.
Try using the disassemble (D) command again, this time with a starting address of $1601:
D1601The monitor tries to disassemble some of the memory of the program you entered, but the result looks nothing like the program. $1601 is the address of the second byte of the LDA instruction, $01, which to the disassembler (and the CPU) looks like a version of the ORA instruction that uses two bytes. At address $1603, the next byte $20 looks like a three-byte JSR instruction. Coincidentally, the next incorrect instruction gets the disassembler back on track, aligned with the correct first instruction byte at address $1607. But by now, a CPU trying to execute this code will get very lost, and probably crash.
Disassemblers are not magic, and they need help from the operator—that’s you—to convert machine code back into human-readable assembly language. The disassembly process requires research, maybe some guessing and checking, taking notes, and labeling addresses and values once you’ve figured out what they mean. A modern disassembly tool can make this process surprisingly easy.
Introducing Ghidra

Ghidra is a powerful disassembler and reverse engineering multi-tool. It supports many types of CPU machine code, including the 6502, and supports extensions to add more. Ghidra was originally developed by the United States National Security Agency (NSA), and has been released as open source and free of cost.
I want to credit two YouTube videos on the topic of using Ghidra for reverse engineering Commodore 64 programs: Introduction to Ghidra by David Youd, and How to start a new C64 project in Ghidra by Jarkko Lehti. These are worth watching when you get a chance, and we’ll be using Lehti’s configuration files in a moment.
Setting up Ghidra
As of this writing, the latest version of Ghidra is v11.2.1. It’s a Java-based application, and it requires a recent version of the Java runtime (21 or later), which you may need to install or upgrade. Ghidra will tell you if your Java is too old. Properly installed, Windows users can double-click on ghidraRun.bat to start the program, and macOS and Linux users invoke the ghidraRun shell script.
As usual, macOS will refuse to run the scripts and tools until you have blessed them in the Privacy & Security panel. You probably know the drill by now. Attempt to start ghidraRun, dismiss the complaint, open macOS Settings: Privacy & Security, scroll down, click Open Anyway. If you use Ghidra for other stuff later, you’ll need to similarly bless some internal components, which you can do in the Terminal app on the command line:
xattr -cr ./Ghidra/Features/FileFormats/os/mac_arm_64/lzfse
xattr -cr ./Ghidra/Features/Decompiler/os/mac_arm_64/decompile
xattr -cr ./Ghidra/Features/Decompiler/os/mac_arm_64/sleigh
xattr -cr ./GPL/DemanglerGnu/os/mac_arm_64/demangler_gnu_v2_*
When you run Ghidra for the first time, it will ask for the path to the Java home directory. This will depend on your operating system. On macOS using Java 23 from Oracle, the path is:
/Library/Java/JavaVirtualMachines/jdk-23.jdk/Contents/HomeGhidra opens its main window, from which you create or select a project, and open tools.
Creating the project

Let’s start a new project using the crossroads.prg file that we extracted from the disk image in last month’s Digest.
Create a new project:
Open the File menu, select New Project.
Select “Non-Shared Project,” click Next.
Create a new folder for the project, and select it. Enter a project name, such as “Crossroads.” Click Finish. The dialog window closes, and the project is created.
Next, import the crossroads.prg file:
Open the File menu, select Import File.
Navigate to the file
crossroads.prg, then Select File To Import.Leave the Format set to “Raw Binary.”
Click the
...button next to Language. Select “6502,” which is at the top of the list for this version of Ghidra. Click OK.Leave everything else at default settings, then click OK. Another window opens with some information about the file. Dismiss this with OK.


Finally, double-click on the crossroads.prg file in the project to open it in the CodeBrowser tool. The first time you do this, Ghidra will offer to analyze the file. Say Yes. Leave the default set of analyzers selected, then click Analyze. The analysis doesn’t produce spectacular results just yet, but it’s usually worth doing.
Here is crossroads.prg in all its glory, in the CodeBrowser window. These are the same bytes we saw in the hex dump, but now they’re listed one per line. We will use this interface to massage the data as we learn what each part of it means.
Commenting the code
Let’s start by telling Ghidra the C64 memory address where this data gets loaded. Because this is a PRG file, it begins with two bytes that are not loaded into memory. We could have gone through an extra step to remove these bytes before importing the data, but for our purposes, it’s enough to just take these into account when telling Ghidra where everything lives.
This data gets loaded into a single block of memory that starts at address $0801. Minus the two PRG header bytes, we can tell Ghidra to start counting addresses at $07FF:
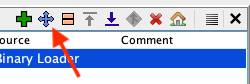
In the Window menu of the CodeBrowser window, select Memory Map. The Memory Map window opens, showing one “RAM” segment that starts at address
0000.Select the “RAM” line, then locate the button whose tooltip reads “Move a block to another address,” a blue arrow-cross icon.
For the New Start Address, type
07ff. Click OK.Close the Memory Map window.
Notice that the data is now lined up with the memory addresses. The first byte of the BASIC bootstrap is at $0801, and the two-byte end-of-BASIC terminator is at $080B. (We peeked at this in the previous Digest.)
Let’s add a comment describing this data. Right-click on the line for $0801 to open the context menu. Select Comments > Set EOL Comment… In the window that opens, type a useful description, such as: “Start of BASIC bootstrap.” You may wish to add a similar comment on $080C, for “End of BASIC bootstrap.”

Initiating disassembly
The BASIC bootstrap uses the SYS command to invoke machine code starting at decimal address 2300. Ghidra even shows the “2300” characters next to the byte listing, guessing that we might be interested in what these look like as ASCII characters. In hexadecimal, this address is $08FC.
Navigate to this address in the byte listing. Here’s a quick way: press “G” (for “go”), then enter the address in hexadecimal (08fc).
Start the disassembly at this address: press “D” (for “disassemble”).

Ghidra has just done a bunch of work for us! It took our word for it that the bytes starting at $08fc are machine code: $a9 $ff represent the LDA #$ff instruction, which Ghidra spells LDA #0xff, and updated the code listing accordingly. It proceeded to the next instruction, and kept going as long as it was reasonably certain that the CPU would treat those bytes as instructions as it executed.
Scroll down, and notice that Ghidra stopped disassembly at address $0cab, where it found an RTS instruction. The bytes starting at $0cac may be more CPU instructions, but Ghidra doesn’t know this for sure. In fact, we can see evidence that it may be data and not instructions: the bytes from $0cb1 to $0cba spell out “CROSSROADS” in ASCII. Ghidra doesn’t know this is more likely to be PETSCII and not ASCII, but it displays the ASCII letters for our benefit, just in case.
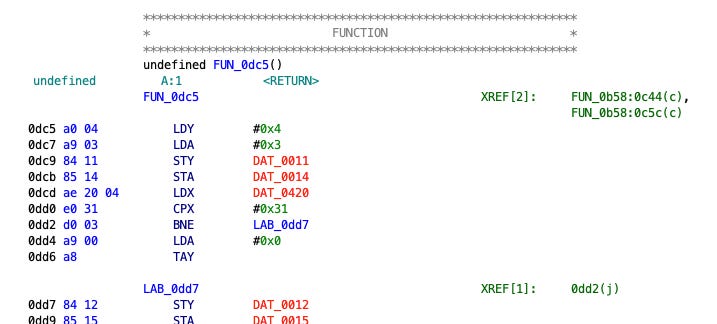
Keep scrolling, down to $0dc5. Ghidra found more code! Starting with the first address we gave it, Ghidra decoded each instruction, and when it found a branching instruction or subroutine call, it continued disassembly at that location, filling everything in. It assigned some temporary labels for things that look like functions, such as FUN_0dc5. As we try to understand what the program does, we can replace these labels with more intuitive names. In the end, we’ll have a fully human-readable assembly language program. (Or as human readable as assembly language gets, anyway.)
Ghidra made similar attempts to highlight data locations referenced in the code, assigning labels such as DAT_08b0. Everything referenced by something else is annotated with the cross references. For example, the byte at address $08b0 is read by an instruction at address $0a7a, so it lists 0a7a(R) (“R” for “read”) next to $08b0.
We can add our own labels. Let’s do this for our entry point, $08fc:
Press “G” for go. Enter
08fc.Press “L” for label. Enter a label name of
start. Because this is the entry point of the program, select the “Entry Point” property. Click OK.
Importing C64 symbols
Ghidra has invented labels for all of the data and code referenced by the disassembled code. The addresses within the imported data range have blue labels and cross references.
Where the code references an address not in the imported range, Ghidra also generated a label, and colored it red. Consider the first few instructions of the program, starting at $08fc:
LDA #0xff
STA DAT_d40e
STA DAT_d40f
This loads $ff into the accumulator, and stores that value to addresses $d40e and $d40f. If these were just memory locations, we would assume that these are variables used by the game for storing game state, like the player’s position. In this case, we can apply some knowledge of how the Commodore 64 works: addresses in the range $d000-$dfff are input-output registers that control, or are controlled by, the computer’s hardware. We can look up what these registers do in a Commodore 64 technical reference.
In this case, these registers belong to the SID sound chip, specifically the frequency of the oscillator on voice #3. We don’t yet know why the program does this, but we do know that’s what it does. The next two instructions and a bit more knowledge of C64 programming gives us a hint:
LDA #0x80
STA DAT_d412
The technical reference says $d412 is the SID voice #3 control register. Setting bit 7 like this tells it to use the “noise” waveform. Crossroads is certainly a noisy game, but it’s probably setting this up to use as a random number generator, or at least a seed for one. We’ll have to keep our eye out for something that samples a value from voice #3.
Now that we’ve identified DAT_d40e et al., we could update the labels to something that describes their functions. To do this, you would right-click on the label and select Edit Label… (or move the cursor onto the label and press “L”).
Considering that the C64 I/O registers always do the same thing in every program, it would be nice if Ghidra could automatically recognize all of them and give them useful names. The following is one way to do this, based on the files supplied by Jarkko Lehti to accompany his YouTube video on the subject.
Download these C64 symbol files:
IO.txt: the I/O registers
KERNAL.txt: the KERNAL jump table subroutines
RAM.txt: commonly used C64 internal KERNAL variables
IO_d000.bin: a binary snapshot of the initial values of C64 I/O registers
kernal_e000.bin: a binary snapshot of the C64 KERNAL
The .txt files tell Ghidra to apply certain labels to certain addresses when they appear in the code. The .bin files fill in the memory ranges themselves in the Ghidra project, so you can get some idea of what’s actually there in the C64’s memory.
In your project, the IO and KERNAL data will exist as overlays. An overlay is a portion of memory that may contain different things at different times, based on system state. With the Commodore 64, I/O registers and KERNAL ROM occupy addresses that can also refer to RAM, based on the memory banking register. Ghidra can only see that an instruction accesses an address, not the memory map of the computer at the time the instruction is called. Telling Ghidra that these memory regions are overlays accounts for the possibility that a given reference to an address may refer either to I/O and ROM, or the underlying RAM.
To create the IO overlay:
From the CodeBrowser window, open the File menu, Add To Program…
Select
IO_d000.bin, click Add To Program.In the Add To Program dialog, click Options… Select Overlay, use a Block Name of
IO, and set the Base Address tod000. Click OK in the Options dialog, then click OK in the Add To Program dialog. Dismiss the Import Results window.
To create the KERNAL overlay, repeat these steps with the kernal_e000.bin file, using a Block Name of KERNAL and a Base Address of e000.
Now we can import the symbols that describe addresses in these regions. Ghidra is a highly scriptable application environment, and we can use a script that comes with Ghidra to import the .txt symbols files.
To import the symbols:
From the Window menu, select Script Manager.
Scroll down to find
ImportSymbolsScript.py. Double-click it to run it.When prompted, select the
IO.txtfile. Click “Go baby go!”Repeat these steps for the
KERNAL.txtfile, and again for theRAM.txtfile.
Ghidra now knows about the I/O registers via an overlay with sensibly named symbols. Ghidra still doesn’t know which references refer to RAM and which refer to I/O. We have to tell it.
Go (“G”) back to the STA instruction at $08fe. Its destination is still the red symbol DAT_d40e. Click on it, then press “R” to edit the reference. In the pop-up window, double-click the reference, then change the dropdown menu that says “RAM:” to “IO:”. Click Update, and close the reference editor. The symbol has changed to D40E_FRQ_3_LO. That’s… better.

It’s unusual for a C64 game to un-bank the I/O registers, so it’s a little inconvenient that each label needs to be applied like this. I haven’t found a good way to automatically declare all references to be for the IO overlay. One possibility might be to add IO_d000.bin as a non-overlay region, then edit the IO.txt symbols file to remove the IO:: part of each address. For now, I like keeping IO as an overlay, because it accurately describes how the C64 works.
I did find a reasonably fast way to update all of the labels manually using Ghidra’s search feature. In the Search menu, select Program Text… Prepare a search for DAT_d in All Fields of the Listing Display, and click Search All. A window opens with the search results, and clicking on a result causes the Listing display to jump to that location. I got 38 results, and it only took me a few minutes to update all of the references to use the IO labels. It’s not the most fun I’ve ever had with a computer, but it didn’t take so long that I regretted not automating it.
Getting some answers
Now that we have at least some idea of what we’re looking at, let’s try to answer a few questions that will help us understand how Crossroads works. These are just questions that occurred to me, in the order I thought to ask them. They may not be the best questions, or in the best order. But let’s see what happens.
Does the program call the KERNAL jump table?
This is an easy one. A call to the KERNAL jump table would look like a JSR to a hexadecimal address beginning with an f. Ghidra will have generated a label like FUN_ffd2 prior to me updating it to use the KERNAL overlay’s symbols, so just like we used a search of DAT_d to find I/O register references, we can search for FUN_f to find calls to KERNAL routines. I get no results from this search, so I’m fairly confident that Crossroads does not call KERNAL routines. Alas, we don’t get to use our KERNAL overlay. Maybe next time.
Does the program use KERNAL vectors?
As we’ve discussed in previous issues of the Digest, most games drive their game loop using CPU interrupts. There are two ways to set up an interrupt handler: replace the KERNAL’s interrupt handlers in $fffa-$ffff, or use a KERNAL vector to add a custom subroutine to the KERNAL’s interrupt handler. Let’s check the latter option first, because it’s more common for simple C64 games.
The designers of the Commodore ROM wanted people to use the VECTOR KERNAL call to read and update the KERNAL vector table, and that’s still a best practice for MEGA65 programs. Even early on, C64 programmers skipped over that part of the manual, and just wrote to the C64 vector table at $0314-$0333. We can search for the string 0314 to find any direct references to the IRQ vector.
Yup, there it is. The instructions at $0ba8-$0bb1 are writing address $11c4 to the KERNAL IRQ vector $0314-$0315.
LDA #0xc4
STA 0314_IRQ_VECTOR_LO
LDA #0x11
STA 0315_IRQ_VECTOR_HI
This appears to be the only vector touched, and it is only set in this one location in the code that Ghidra has disassembled. Let’s go to the address being written to the vector and check it out: “G”, then 11c4.
Hoo boy, Ghidra hasn’t disassembled this yet! This is because the main routine, which sets up the game and installs the IRQ vector, doesn’t actually call the IRQ handler directly. We have a bit more work to do. Press “D” to start disassembly from this address. Also, press “L” to add an entry point label, with a name such as irq.
We’ll have to re-do our searches for I/O register labels and KERNAL calls now that we have more disassembled code. That’s just how it goes. I found 8 more I/O registers, but still no KERNAL calls.
Does the program do any C64 CPU bank switching?
I mentioned that most games leave I/O registers banked to $d000-$dfff, the initial state of the C64. We can double-check that by looking for references to the C64 bank switching register, address $0001.
A search for DAT_0001 does produce two results in the start-up routine, so it’s worth taking a closer look. Starting at address $09f9, the routine sets this to $73, or binary %01110011. According to C64 technical documentation, this setting makes sure the C64 character ROM—the graphics data for the PETSCII font—is visible at $d000-$dfff instead of the I/O registers. It’s not that way for long, though. Just below, at address $0a10, the banking register gets set to $77, or binary %01110111, which switches the I/O registers back in.
While the character ROM is visible, a short loop copies the first 472 bytes of PETSCII graphics data to address $2000.
	LDX #0x0
LAB_09ff:
	LDA DAT_d000,X
	STA 0x2000,X
	LDA DAT_d0ec,X
	STA 0x20ec,X
	INX
	CPX #0xec
	BNE LAB_09ff
Now that we know what this does, we can rename the LAB_09ff label to something like copy_char_loop, and add explanatory comments to the bank switching instructions. We can also relabel DAT_0001 while we’re at it.
Does the program use any self-modifying code?
From our perspective as reverse engineers, one of the scariest things a program can do is modify its own code. The program is entirely within its right to do this—code is just data in memory—but it means that the disassembler may not be seeing the code in the form it is executed.
To find places where the program might be modifying itself, we have to look for attempts to store values in locations that Ghidra believes are inside subroutine code. I bet there’s a way to get Ghidra to make a list of such places, but I haven’t found one yet. I did notice, however, that Ghidra refers to such addresses by the name of the function, plus an offset, like this example near the entry point:
LDA #0x0
STA FUN_0b4a+1
LDA #0x28
STA FUN_0b4a+2
These address expressions appear in a grey color. From visual inspection, I found only a few examples of this. Thankfully, they were all short subroutines that were easy to understand, and all of the self-modifications were to addresses for LDA and STA instructions.
Several of these appear to be simple utility functions for using addresses from variables together with indirect addressing. For example, FUN_0b4a is simply the STA instruction in absolute Y-indexed addressing mode, followed by an RTS. To use this routine, the program writes an address into the STA instruction, sets the A and Y CPU registers, then calls the subroutine:
FUN_0b4a
  STA 0x0000,Y
  RTS
This probably saved the developer some headache, using a single self-modifying mechanism instead of having every subroutine modify its own instructions. The initialization routine near the entry point uses this mechanism as part of a loop to fill some memory with zeroes.
Is there any more code?
We found the entry point and the IRQ vector routine, and we identified self-modifying code and confirmed that it’s not doing something crazy like dynamically writing JMP instructions to memory at run time. It looks like Ghidra has found most of the code in the program. Are we safe to conclude that the remaining unidentified regions are static data, or perhaps initialized variable space?
This requires a bit of judgement, a bit of guesswork, and a willingness to change our minds later, but we can start to form some conclusions from a visual inspection of Ghidra’s analysis. Here’s what I see so far:
$080d-$08fb: I see some repeating numeric patterns that are unlikely to be instructions. Ghidra found cross-references into this memory starting at $08b0, and they’re all read-only references from the initialization routine. The program must refer to some of this data with dynamically calculated addresses that Ghidra can’t see. It’s not conclusive, but with no obvious writes to this memory, this is probably static data, such as graphics patterns.
$0cac-$0dc4: Ghidra is displaying obvious patterns in the ASCII decoding that match text displayed on the game’s screen, with strings such as “CROSSROADS” and “1PLAYER,” and many space characters ($20). There are only a few explicit read-only references. This is probably character data for the static parts of the display.
$0f65-$11c3 and $15fe-$1693: These are less obvious to me just from staring at them. Some of it is clearly data, but I don’t yet know how to interpret patches of it. Once again, there are no explicit instructions writing to these areas.
For now at least, I feel confident that these regions are static data and not code, and that Ghidra has found all of the code in the program.
What’s in the data?
We can learn more about the suspected data regions by double-clicking on the cross-references and digging around the code that refers to them. We can also make some guesses about how the data is encoded, and try to decode it to see if we recognize any patterns, similar to how we identified text strings with Ghidra’s built-in ASCII decoding.
I’m especially interested to find the character graphics data that gives Crossroads its special flair. This is likely to take the form of monochrome character pixel data, where each byte represents a row of 8 pixels, and consecutive bytes are stacked, usually in a square of 8 rows. If we visualized the bytes in suspicious data regions this way, would the Crossroads cast of characters jump out at us?
Ghidra has extensive features for visualizing data structures. Once we have a guess as to how data should be interpreted, we can paint data types onto the bytes and see if they make sense. For example, to visualize a byte as a binary number:
Locate address $080f. The byte value is $44. Ghidra doesn’t know how to interpret this, so it displays a type of
??, its hex value, and its ASCII value.Right-click on it to open the context menu, navigate to Data, and select the
bytetype. Ghidra updates??todb.Right-click again, navigate to Data, and now select the Settings… option that has appeared now that the value has a type. Change Format to “binary” and Padding to “padded.” Click OK. Ghidra updates the visualization to a padded binary value:
01000100b.

Let’s try this for a chunk of the data region $080d-$08f9. (We can always undo it later.) Click-drag with the mouse, or move the cursor to the first line and hold Shift while cursoring down, to select lines. Use the Data context menu to make them all bytes displayed as padded binary.
083d ff    db    11111111b    ; ########
083e 8f    db    10001111b    ; #   ####
083f ff    db    11111111b    ; ########
0840 3c    db    00111100b    ;   ####
0841 7e    db    01111110b    ;  ######
0842 7e    db    01111110b    ;  ######
0843 ee    db    11101110b    ; ### ###
0844 87    db    10000111b    ; #    ###
It’s a little difficult to make out when displayed as 0’s and 1’s, but I see some familiar faces. Going eight bytes at a time, I see two frames of animation for each of an enemy missile ($080d), a bullet ($081d), the Human/player ($082d), the Purple Rubberhead ($083d), and more. I have to squint to see the rest, but if each of the nine enemies gets 16 bytes starting at $083d, it feels safe to say these are graphics tiles up to at least $08cd.
How does the program set up character graphics data?
We have a rough idea that the game keeps its graphics assets starting at $080d, and establishes its custom character font at $2000 with some combination of this data and PETSCII characters from character ROM. We’ve already found where the set-up routine ($08fc) copies the character ROM to $2000. What else does it do?
It’s relatively easy to see that a big chunk of the set-up routine is messing around in the $2000 memory region. Starting from the beginning, it sets a few registers, then immediately dives into the work of rendering the character data, with various loops and STA instructions indexing into this memory.
The characters of Crossroads walk in four directions, with two frames of animation. We only found two frames of animation in the graphics data, with the characters facing to the right. Can you guess where it gets the graphics for the other three directions?

To achieve the full effect, the set-up loop takes the 8x8 right-facing creature graphics and writes it into character graphics memory. Then it flips each byte horizontally and writes the left-facing copy. Then it rotates it 90 degrees one way for up-facing, and 90 degrees the other way for down-facing.
Moreover, the second step of each character’s animation is drawn across two character tiles, for that slick grid-breaking animation. The creature takes up two characters on the 40x25 screen for this half step, and no other creature or item is allowed in either tile at this moment. The set-up routine renders these half-steps dynamically from the 8x8 pixel data, using bit shifting instructions to produce half-tile images. I see groups of four bit shifting instructions at $0a5d and $0a6d that might be involved in this process.
Just after setting up the character data at $2000, the program sets VIC register $d018 to $18. This establishes how the VIC uses memory, and indeed, it sets the character memory pointer to $2000. It also sets the screen memory location to $0400. The VIC-II can only see 16 KB of the address space at a time, and which 16 KB is selected by a register at $dd00. Crossroads does not appear to change this register from its default setting.
Future possibilities with Ghidra
That’s a good start, and plenty for a single newsletter. Ghidra is a very powerful tool and I’m still learning about all it can do.
Ghidra is highly extensible, and there is substantial potential for extensions and scripts to support C64 and MEGA65 development and reverse engineering. In his video, Jarkko Lehti is using his own Ghidra fork with a few nice features such as PETSCII string visualization.
When I was squinting at the character set data, I was wishing for a bit of tool support for visualizing bitfields as graphics, much like how Retro Debugger lets you view memory contents in different ways. I wonder if Ghidra can do custom inline data visualizers like this, or if a feature like this is already available.
The annotated disassembly can be exported in multiple formats, but none of them resemble something that could be re-assembled by a tool such as Acme assembler. A custom export tool or post-processing script would be handy for that, and would be easy to write.
Of course, the thought naturally occurs to someday use Ghidra to disassemble MEGA65 machine code programs. It’d take some effort, but it is possible to write an extension to provide 45GS02 CPU support to the disassembler. Ghidra has an entire language for specifying new processors called SLEIGH.
It’d also be good to generate symbols files and overlays for all of the MEGA65’s I/O register personalities. I already have symbol generator scripts that could be tweaked to produce something that Ghidra can import.
In practice, most MEGA65 machine code programs that exist today have friendly authors that have open sourced their code. It’s still fun to think about.
I chose Crossroads for this demonstration for a few reasons. For one, it really was one of my favorite games, so I was excited to play with it. But also, I had a suspicion that its internals were straightforward enough to understand through disassembly. As fast and seamless as Crossroads is to play, you only need to know a few things about C64 programming to start to make guesses about how it works just from looking at it.
Many C64 games and demos use data compression techniques to limit disk space and loading times. This can make disassembly more difficult, because you can’t just load the PRG into Ghidra directly. One possible technique is to run the program in Retro Debugger, let it decompress everything into memory, then take a snapshot of the memory of the running program. You can then apply disassembly techniques to the snapshot. I suspected that Crossroads did not use compression for code, and felt comfortable just loading the PRG file directly into Ghidra.
If you’re interested in writing programs for the MEGA65, it’s worth studying C64 programs. The Commodore 65 was designed as a true technological successor to the C64, and many C64 programming techniques apply to C65 and MEGA65 programs. The original source code for many C64 programs have been lost to time, but we can use tools like Retro Debugger and Ghidra to pull them apart and reconstruct their secrets.
There’s one more tool that we can use to reverse engineer C64 programs—and it’s sitting right beside you. The MEGA65 can run many C64 programs in its GO64 mode, and you can use the MEGA65 core’s serial debugger, along with a powerful frontend like m65dbg, to analyze a running program. We’ll have to revisit this in a future Digest.
Onward into the new year!
— Dan